

Overview#
For this part, we’ll be using AWS’s Cloudfront domain fronting service to hide our implant’s callbacks and blend the traffic it generates within the legit traffic in order to evade NDRs and not trigger any alerts for the blue team.
Cloudfront will act as the middleman between our redirector and the compromised host. The implant will query our domain name, cloudfront will proxy that request encrypt the connection, add its headers and then send it back to our redirector with a encrypted connection.
Pros#
- Hiding the redirectors IP: Cloudfront is acting as a reverse proxy; the defender will only see valid and trust
*.cloudfront.netconnections. - Whitelisting:
*cloudfront.netdomains are trusted and known, so these channels can be used to evade egress restrictions. - SSL/TLS: Using a valid AWS SSL certificate won’t trigger any suspicions like self-signed certificates and will help secure our channel when being inspected.
Cons#
Setting up View-to-Edge connection#
Creating Cloudfront instance#
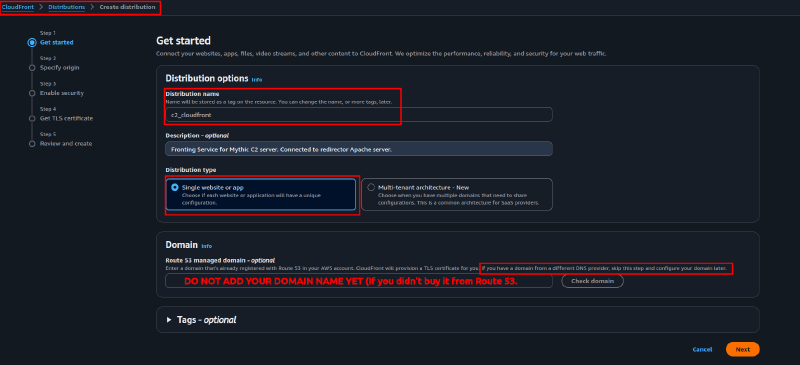
Navigate to Cloudfront page and create an instance.
Careful
If you haven’t bought your domain name from Amazon’s Route 53, do NOT add your domain name just yet. This field is only for domains bought from their service. We’ll do some work after in order to add our domain name.
TIP
I highly recommend you provide detailed names and descriptions of every component of the infrastrucutre. It gets messy very quickly and if you don’t have clear steps or you’re finding your way in (as me), you will, surely, fuck it up quickly.
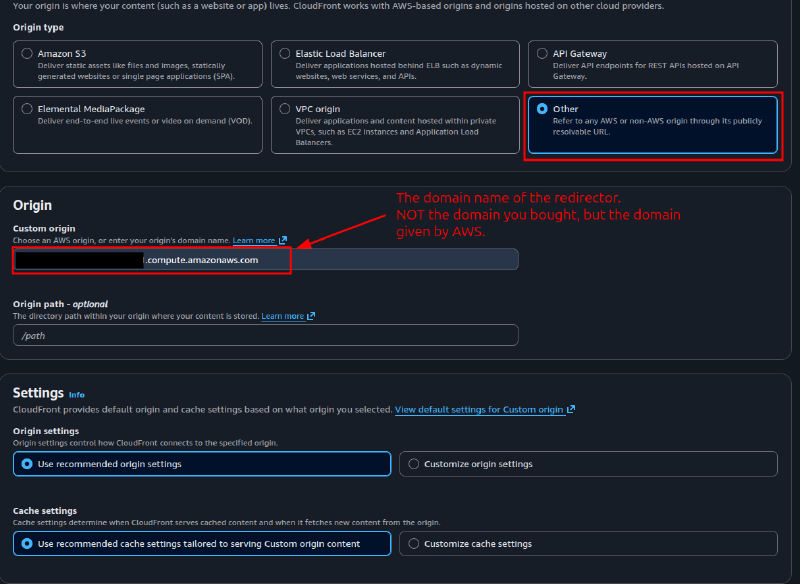
Retrieve the domain name of the redirector EC2 given by AWS. NOT the domain name you bought. This tells which component you want to link Cloudfront with.
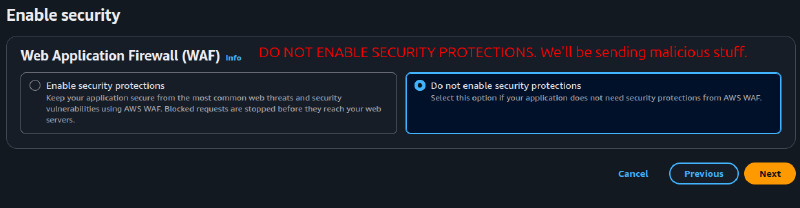
And finally disable protections, we don’t want to flag our own traffic.
Custom Header Considerations
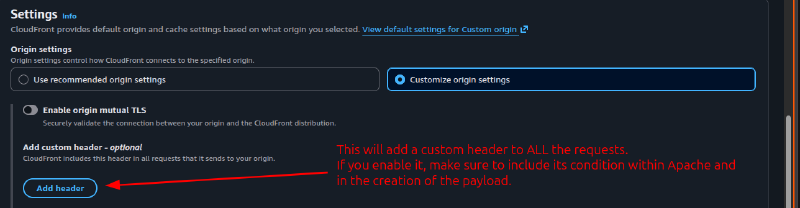
If you choose to add a custom header in Cloudfront’s dashboard, put it mind that the header will be appended in all of your requests and callbacks from your implant. So make sure you correlate your redirector’s configuration and rules.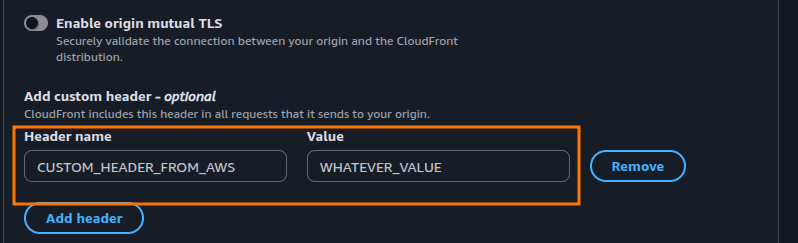
$curl -I https://domain.tld:
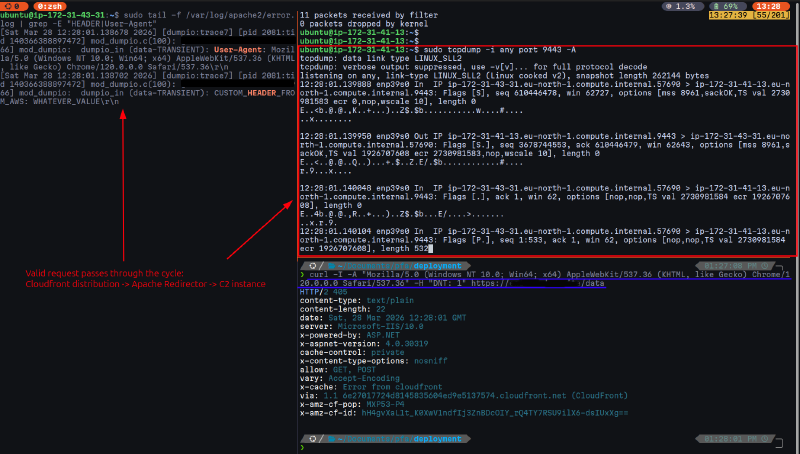
sudo tail -f /var/log/apache2/error.log | grep -E "HEADER|User-Agent"
<SNIP> mod_dumpio:  dumpio_in >(data-TRANSIENT): User-Agent: curl/8.5.0\r\n
<SNIP> mod_dumpio:  dumpio_in >(data-TRANSIENT): CUSTOM_HEADER_FROM_AWS: WHATEVER_VALUE\r\n
The header is added even when we didn’t include it. So put that in mind.
Linking a domain name to Cloudfront#
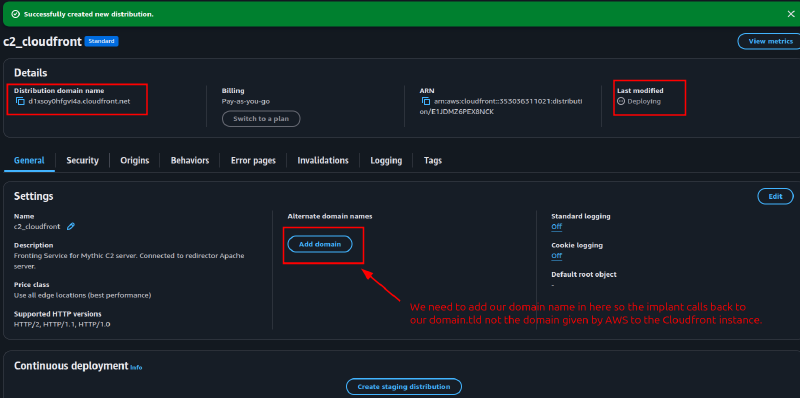
Okay now we got a running Cloudfront instance. AWS associate a domain name to it in *.cloudfront.net format. But, we need to link our domain name to it so our implant can call back to us. Calling back directly to a Cloudfront domain is too suspicious and doesn’t make sense. It clearly shows that the domain name is of a temporary or staging assets, thus getting us caught.
Navigate to the distribution’s panel and click on add domain
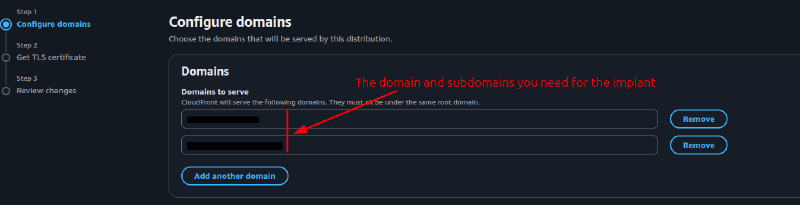
The fill out the root domain and subdomains needed for your case:
And we hit an error:
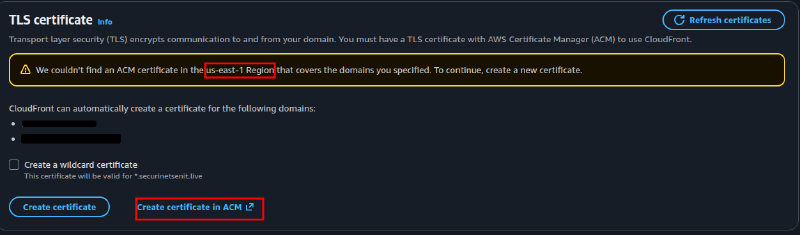
CERTIFICATE ERROR
This is due to AWS’s policy and way of associating domains to distributions.
We need to have a valid and verified certificate located in us-east-1 via AWS ACM that we will choose as a certificate for our distribution.
Crafting a valid ACM Certificate#
So click on Create Certificate in ACM which will redirect us to the ACM portal. You should be fine filling the next steps:
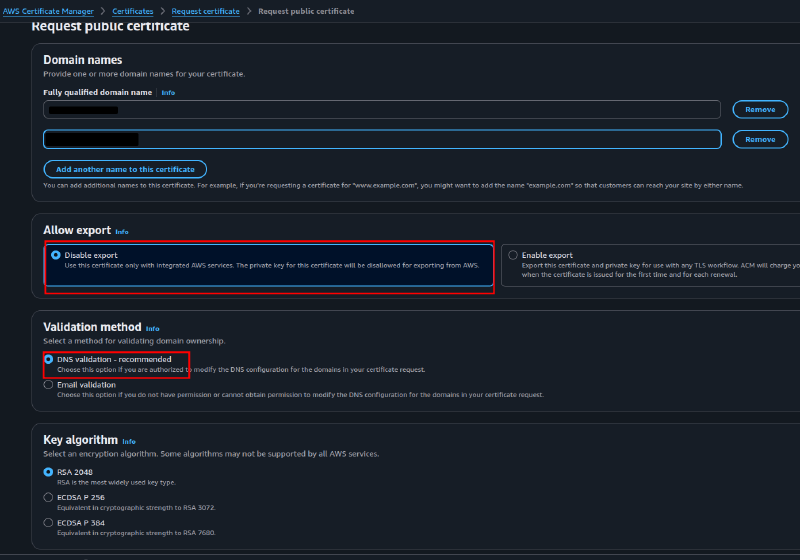
So now we created a Certificate, but as I already mentionned it needs to be valid and verified. ‘Verified’ means that we need to prove to AWS that we own the domain and we can manage its DNS configuration.
This will be done by adding some CNAME records within our DNS configuration.
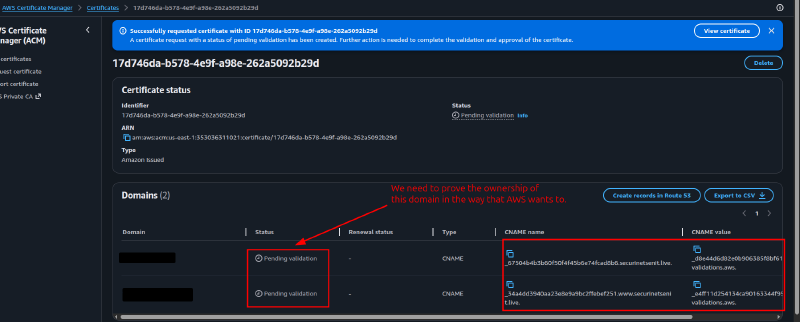
Copy the value of the given CNAME records and the new DNS entries should look like this:
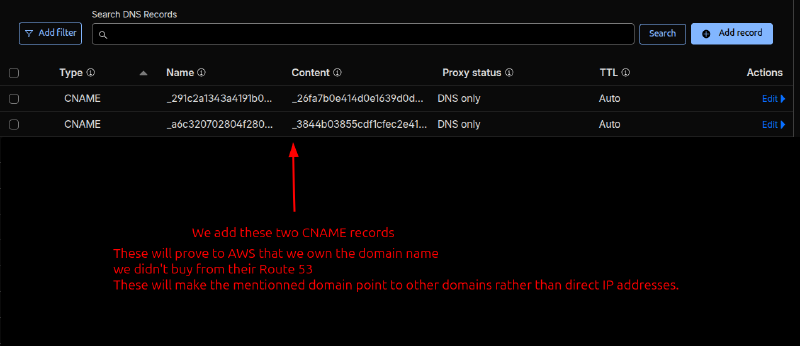
DNS PROXY
Do not set proxy status to ON. This will intercept the requests before they reach Cloudfront and proxy them to Cloudflare’s servers.
Clouflare will throw an error when trying to add a CNAME record with proxy set to ON, but you still need to know the logic behind it.
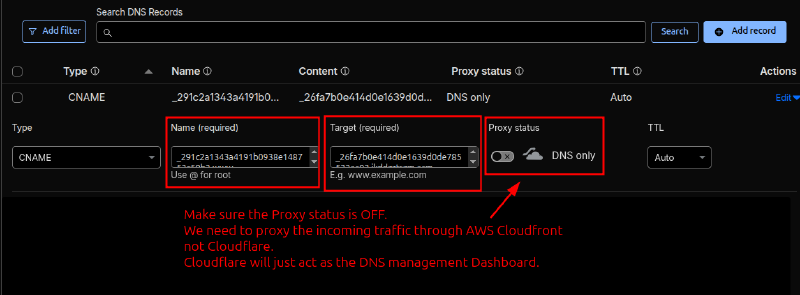
And finally, don’t forget these two entries telling Cloudflare to make your domain.tld an alias for the Cloudfront’s domain name:
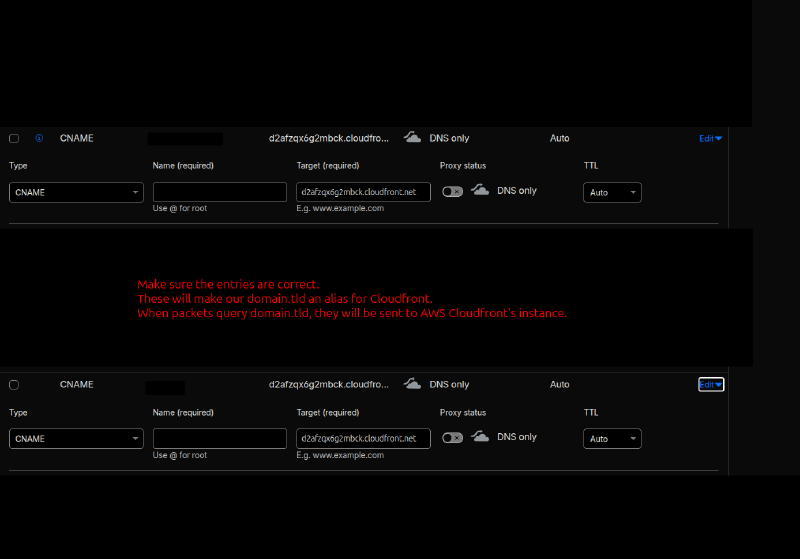
Without them, your domain.tld isn’t linked to Cloudfornt and isn’t an alias for the main distribution’s domain name. So we need them first to proxy our traffic to cloudfront. That’s it.
By now we should see the succesful verification. It shouldn’t take more than a couple of minutes:

Client-side Success
So now, we have linked our domain to Cloudfront.
Testing and validation#
Intuitively, independently from the redirector’s rules, let’s curl the domain and see what we get back
curl -k -A "Mozilla/5.0 (Windows NT 10.0; Win64; x64) AppleWebKit/537.36 (KHTML, like Gecko) Chrome/120.0.0.0 Safari/537.36" -H "DNT: 1" https://domain.tld
<!DOCTYPE HTML PUBLIC "-//W3C//DTD HTML 4.01 Transitional//EN" "http://www.w3.org/TR/html4/loose.dtd">
<HTML><HEAD><META HTTP-EQUIV="Content-Type" CONTENT="text/html; charset=UTF-8">
<TITLE>ERROR: The request could not be satisfied</TITLE>
</HEAD><BODY>
<H1>502 Bad Gateway ERROR</H1>
<H2>The request could not be satisfied.</H2>
<HR noshade size="1px">
We can't connect to the server for this app or website at this time. There might be too much traffic or a configuration error. Try again later, or contact the app or website owner.
<BR clear="all">
If you provide content to customers through CloudFront, you can find steps to troubleshoot and help prevent this error by reviewing the CloudFront documentation.
<BR clear="all">
<HR noshade size="1px">
<PRE>
Generated by cloudfront (CloudFront) HTTP3 Server
Request ID: yzKKc98mkrPcgCsGY0wx7clYyZNHm6HwZuaqdjh7wN63LVGgCUQlbw==
</PRE>
<ADDRESS>
</ADDRESS>
</BODY></HTML>HTTP/2 502
content-type: text/html; charset=UTF-8
content-length: 932
date: Thu, 26 Mar 2026 00:01:47 GMT
x-cache: Error from cloudfront
via: 1.1 7fb6a67b54f1292982508050e491d34c.cloudfront.net (CloudFront)
x-amz-cf-pop: MXP53-P4
x-amz-cf-id: EmIm8djtLQvhDZDO6PvF_ziaj6BfYrAKT4KXskyf51GVraCItoE23g== What we’re seeing here is cloudfront telling us that the request passed their servers correctly and without any client-side errors, but the target server behind it -our redirector- isn’t responding correctly. So this is a server-side error, which may seem bizarre but it is not. All we need now is checking how Cloudfront is communicating with our redirector. But the client-side is fine. Let’s move on.
Setting up the Edge-to-Origin connection#
What’s happening
Intuitively, we’ve been setting up the client-side only from the start, configuring the domain …etc but we didn’t tell our redirector anything or link it to Cloudfront in any way.
The server-side error that occured is due to how AWS trusts certificates. Currently, we didn’t configure the connection between Cloudfront and the redirector so we need to create a certificate and finally link both parties.
Careful if using another provider’s SSL certificate
AWS won’t trust Cloudflare’s certificate, I don’t why but it didn’t, so the connection between the redirector and Cloudfront should be done using a certbot certificate that we create maually.
Crafting a certificate#
$sudo apt install certbot python3-certbot-apache -y
$sudo certbot --apache -d enit-kedux.site -d www.enit-kedux.site
This will create and manage our certificate and modify the /etc/apache2/sites-available/redirector.conf file like the following:
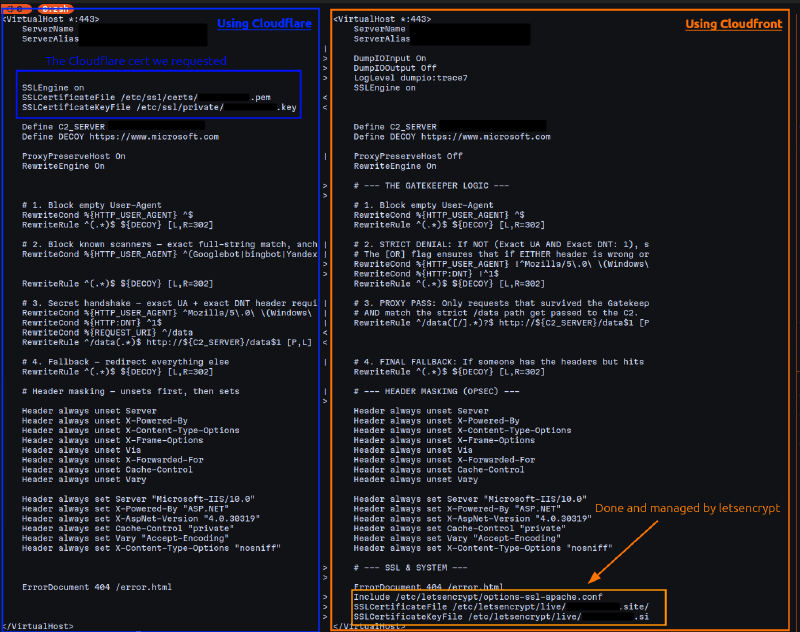
The cloudfront’s part will be discussed in the next post. For now focus on the lines responsible of the SSL certificate part.
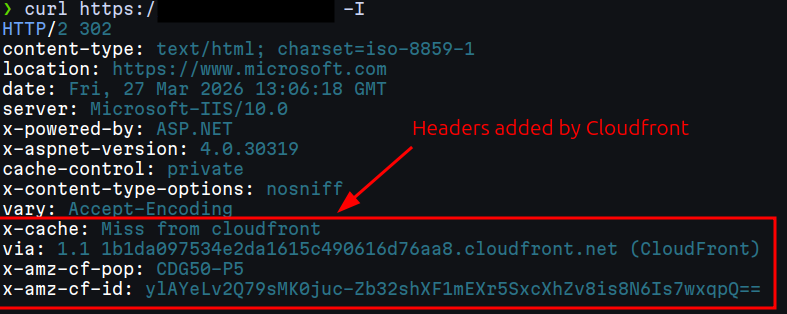
You can already view the headers added by Cloudfront
Final result#
Everything should be fine, the responses will vary based on your redirector’s configuration and rules.
Valid request#
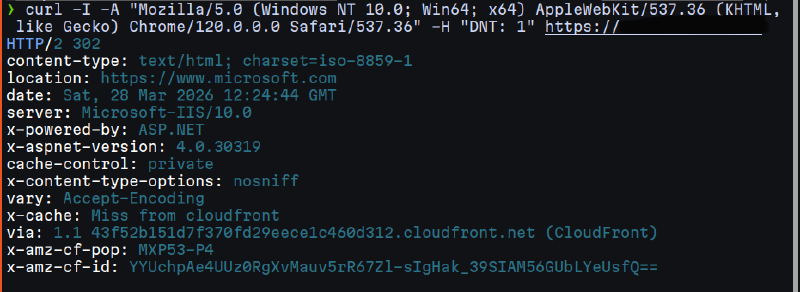
Exactly as setup, and a succesful redirection to Microsoft’s website.
You can now validate your redirector’s rules and shit.
Dynamic IP behavior of Cloudfront#
Cloudfront’s distribution will always change its IP address which makes it really helpful agaist IP blacklisting.
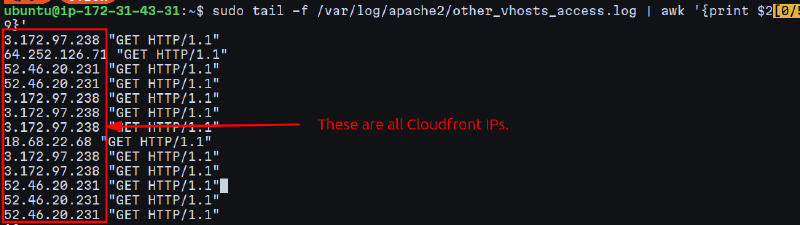
You can verify that these are from AWS IP ranges using this command:
$ whois 3.172.97.238                                                                                ─╯
<SNIP>
NetRange:       3.128.0.0 - 3.255.255.255
CIDR:           3.128.0.0/9
NetName:        AT-88-Z
NetHandle:      NET-3-128-0-0-1
Parent:         NET3 (NET-3-0-0-0-0)
NetType:        Direct Allocation
OriginAS:
Organization:   Amazon Technologies Inc. (AT-88-Z)
RegDate:        2018-06-25
Updated:        2018-09-13
Ref:            https://rdap.arin.net/registry/ip/3.128.0.0
OrgName:        Amazon Technologies Inc.
<SNIP>
Logging in CloudWatch#
Making good use of CloudWatch to validate the requests we send:
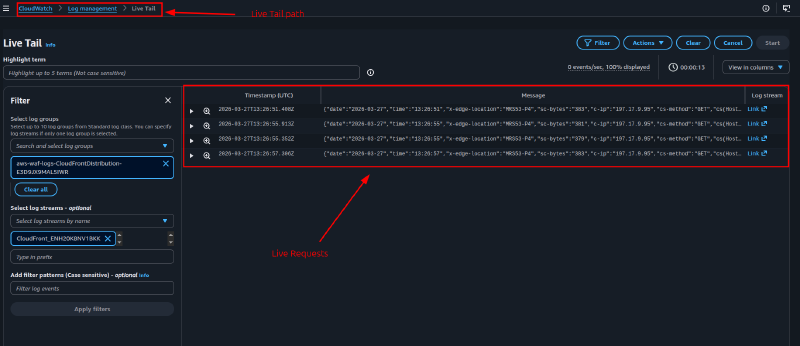
Intercepting the packets#
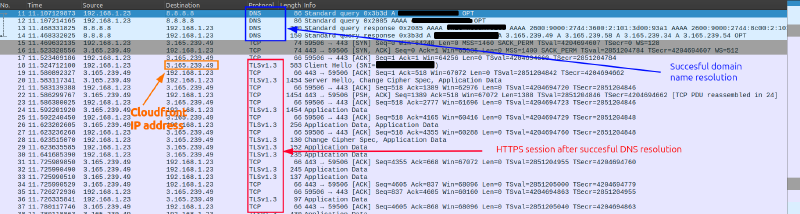
After some filtering, we can view the encrypted HTTPS session the curl command created: